
[MP] MakePreview – 1 per pass, Preset, Action
Creates a viewport preview (playblast) of the activated pass and writes it to the output path. Run it from Execute like any other action pmodifier.
Most of the controls – the frame range, Size %, the viewport-settings override, the display categories and the on-frame overlays – are the same as the built-in 3ds Max Make Preview (Create Preview) dialog and behave exactly the same way. renderStacks adds a tokenized output path, an optional per-frame MAXScript snippet, and MP4 output.
Options
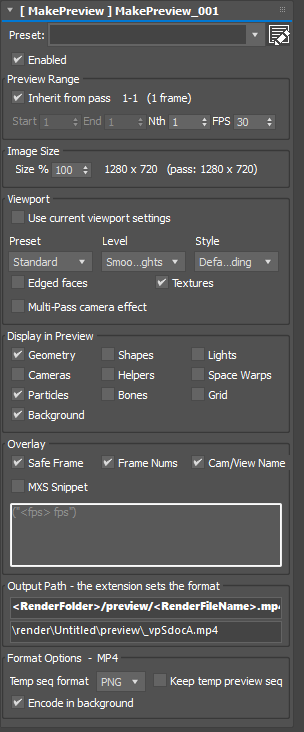
- Enabled – enable / disable the action.
- Output Path – where the preview file is written. You can use renderStacks tokens just like Render Output. The file extension sets the output format (for example
.mp4,.avi, or an image sequence). - Output Preview – the resolved path that will be built, with a right-click menu.
- Inherit from pass / Start / End / Nth / FPS – the frame range of the preview. Inherit the pass range or set your own Start / End; Nth renders every Nth frame; FPS sets the preview playback rate.
- Size % – preview resolution as a percentage of the viewport size.
- Use current viewport settings – capture the live viewport look. Turn it off to override with Preset / Level / Style, Edged faces, Textures and the Multi-Pass camera effect (depth of field / motion blur).
- Display – which object categories are visible in the preview: Geometry, Shapes, Lights, Cameras, Helpers, Space Warps, Particles, Bones, Grid, Background.
- Safe Frame / Frame Nums / Cam/View Name – overlays drawn on the preview frames.
- MXS Snippet – run a MAXScript expression on every preview frame (for example, to draw custom text). The
<fps>token is replaced with this pmodifier’s FPS.
MP4 Output
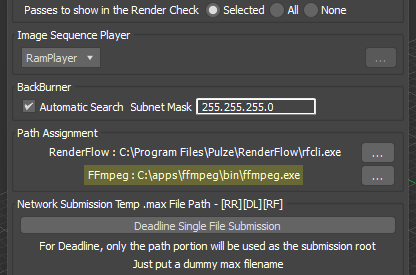
Give the Output Path an .mp4 extension and renderStacks renders a temporary image sequence, then encodes it to an H.264 MP4 at high quality (FFmpeg, CRF 15, yuv420p). This needs FFmpeg: set its path in Preferences, or renderStacks will look for it in the usual places (C:\ffmpeg, C:\Program Files\ffmpeg, Chocolatey, and any ffmpeg* folder off the drive root). Without FFmpeg the rendered frames are left in a temp folder and no MP4 is written.
- Temp seq format – PNG or JPG, the format of the intermediate frames rendered before the encode.
- Keep temp preview seq – leave the temp folder (the frames, the encoded mp4, and the
.batthat ran FFmpeg) in place after encoding. Handy when an encode goes wrong, since a background encode has nobody watching it. - Encode in background – on: FFmpeg is launched and the pass moves straight on, so a long encode does not hold up the queue (the mp4 appears shortly after the pass finishes). Off: the pass waits for FFmpeg and reports whether the mp4 was really written.